VDW- DENTAL
RAYPEX 5 Operating Manual Rev 4 Oct 2017
Operating Manual
220 Pages
Preview
Page 1
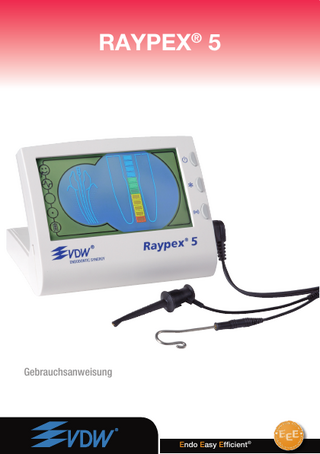
RAYPEX® 5
Operating Manual
Endo Easy Efficient®
2
en
You have made a good choice with Raypex® 5 – one of the most innovative apex locators on the market. Based on the proven technology of the 4th generation devices, this apex locator has been optimized. Raypex® 5 presents additional features, e.g. the special display graphics and its user‑friendly ergonomic design.
Fig. 1 Raypex® 5 electronic apex locator
Manufacturer VDW GmbH Bayerwaldstr. 15 81737 Munich Germany Phone +49 (0) 89 627 34 - 0 Fax +49 (0) 89 627 34 - 304 info@vdw-dental.com www.vdw-dental.com
3
Table of Contents 1. 1.1. 1.2.
Symbols Used... 4 In these Instructions for Use... 4 On Packaging, Device and Components... 4
2.
Indications for Use... 4
3.
Contraindications... 4
4.
Adverse Reactions... 5
5. Step-by-Step Instructions... 5 5.1. Package Contents... 5 5.2. Short description... 5 5.3. Display icons... 5 5.4. Charging the battery... 7 5.5. Operation... 8 5.5.1. Connecting the Device... 8 5.5.2. General Information... 8 5.5.3. Sound Level Selection... 9 5.5.4. Measurement Process... 9 5.5.5. Touch probe... 10 5.5.6. Interruption of measurement... 10 5.5.7. Automatic shutdown... 10 5.6. Demo mode and Virtual apex... 10 5.6.1. Demo mode... 10 5.6.2. Virtual apex... 11 6.
Maintenance, Cleaning and
6.1.
Sterilization... 11 General information... 11
6.2.
Cleaning, disinfection and sterilization (in accordance with DIN EN ISO 17664)... 12 6.2.1. Pre-Treatment... 12 6.2.2. Manual cleaning and disinfection... 13 6.2.3. Inspection/Maintenance... 14 6.2.4. Packaging... 14 6.2.5. Sterilization... 14 6.2.6. Storage... 15 6.2.7. Material resistance... 15 7. 7.1. 7.2. 7.3. 7.4.
Troubleshooting... 15 Electric Length Determination and X-Ray Technique... 18 Tester for operation check-up... 18 Checking the device... 18 Checking the measuring cable (ONLY AFTER checking the device)... 19
8.
Conformity... 19
9.
Manufacturer... 19
10.
Warranty... 20
11.
Disclaimer... 20
12. Technical Specifications... 20 12.1. Specifications... 20 13.
Accessories... 21
Endo Easy Efficient®
en
4
1. en
Symbols Used
1.1. In these Instructions for Use
WARNING
Failure to follow all instructions correctly during use can damage the product or endanger users/patients.
Additional information; explanation of operation and performance.
NOTE
1.2. On Packaging, Device and Components
0123
2.
Manufacturer
Class II equipment
Type BF applied part, protection against electric shock
Attention, consult accompanying documents
Direct current
Do not dispose of in domestic waste
CE marking
Indications for Use
FOR DENTAL USE ONLY! Raypex® 5 is a micro-chip controlled device used for root canal length determination. The Raypex® 5 is designed for dental use only by trained and qualified practitioners who act according to the national regulations.
3.
Contraindications
Do not use Raypex® 5 near devices emitting electromagnetic noise such as fluorescent lamps, film viewers, ultrasonic devices, etc. Cellular phones, remote controls or other devices generating electromagnetic waves may cause abnormal operation of Raypex® 5. Such devices should be turned off. We do not recommend to use Raypex® 5 on patients with pacemaker implants or on patients who have been cautioned by their physicians against the use of small electric appliances such as shavers, hair dryers, etc.
5
4.
Adverse Reactions
5.3. Display icons
Unknown.
5.
Step-by-Step Instructions
5.1. Package Contents Before set-up, please check the contents of the package: • 1 Raypex® 5 apex locator; • 1 Charger, 1 measurement cable; • 1 Tester for operation check; • 1 Accessory set including: 2 lip clips, 2 file clips, 1 touch probe; • 1 User manual; • 1 Instruction CD-ROM. WARNING Read this manual before initial use and store it carefully.
5.2. Short description Raypex® 5 has a swivel-jointed adjustable front panel with a large graphic display. ROOT WIZARD
APEX ZOOM
Shows coronal and median region
Shows preapical and apical region
Fig. 2 Display of Raypex® 5
Endo Easy Efficient®
Measurement status As long as the measurement circuit is open, the lip clip icon blinks. If the icon blinks during the measurement process, stop measuring and check lip clip and file clip connection. Measurement cable connection Indicates proper connection of the measurement cable to the device. If the connection is deficient the icon blinks. The icon stops blinking when the measurement cable is connected to the cable jack at the right side of the device. General Warning icon Is activated when the device detects a failure. In the case the battery is nearly empty, Raypex® 5 is switched to power saving mode and the icon starts blinking. In such case the colors on the display are not visible. After battery recharging regular operation mode is restored. Sound level indicator Displays the sound level of the acoustic signals: • 3 arcs – high volume; • 2 arcs – medium volume; • 1 arc – low volume; • No arcs – mute. Battery level indicator Displays charge level of the battery during normal operation and battery charging. When battery is flat, the indicator blinks.
en
6
The electronic unit and the base are connected by a swivel joint allowing adjustment of the optimal viewing angle of the display. The device may be folded up for transportation and storage (Fig. 3). en
Fig. 3
Function and settings in Fig. 4 and Fig. 5.
Display ON-OFF Demo mode Volume Measurement cable / charger cable jack Electronic unit
Fig. 4
7
en
Battery compartment
Measurement cable compartment
Service interface
Fig. 5
5.4. Charging the battery WARNING Prior to first use, the battery must be charged for 24 hours ! Raypex® 5 is powered by a NiMH rechargeable battery. The battery status is shown during measurement and while recharging. If the battery is low, the last segment on the battery indicator blinks and the battery must be recharged. In the case the battery is nearly empty, Raypex® 5 is switched to power saving mode (indicated by blinking icon). In such case the backlight is blocked and colors are not visible. The device can continue normal measurements. After battery recharging regular operation mode is restored. • Remove the measurement cable from the patient and from the device;
• Connect the external charger to the jack and plug it into the power outlet; • If the battery is fully discharged, e.g. when it has not been used for a longer period of time it must be recharged for 24 hours. It the battery is low 12 hours recharging will suffice. WARNINGS • Only use the original charger! • Unplug the device before replacing the battery! Replacement of the rechargeable battery 1) Open battery compartment and remove battery. 2) Carefully disconnect cable from the jack on the left. 3) Carefully re-connect new battery.
Endo Easy Efficient®
8
en
4) Replace battery into battery compartment. 5) Close battery compartment. 6) When you purchase new rechargeable batteries look for the reference number under item "13. Accessories", page 21.
On the display appears the following image:
WARNING The old battery must be disposed of in accordance with local regulations.
5.5. Operation WARNINGS • To isolate the working area always place a rubber dam; • Prior to measurement the access cavity must be dried with a cotton pellet in order to prevent leaking current; • Select the size of the measuring file to slightly grip at the apex; • Always wear gloves during the measuring procedure; • Do not connect or plug anything into the service interface. Only for the VDW service!
5.5.1. Connecting the Device 1) Insert the measurement cable into jack at the right side of the device. 2) Connect the file clip and the lip clip to the cable. 3) Press On/Off button. 4) Place the lip clip on the patient's lip on the opposite side of the tooth to be treated. 5) Insert the file into the root canal and clamp the file into the file clip (Fasten file clip on the metal part – directly underneath the shaft of the file)
Fig. 6
5.5.2. General Information The device does not need to be calibrated. Raypex® 5 works with all types of metal instruments, e.g. stainless steel and NiTi files (no strongly oxide-coated NiTi files). The size of the file must correspond to the size of the canal, i.e. it must fit the apical constriction. Raypex® 5 operates in nearly all canal conditions (wet, slightly wet, with blood, pus etc.). If the canal is very dry, e.g. in the case of a restoration, it must be moistened with an irrigation solution. Raypex® 5 is controlled by a microchip, no further settings are required. Every measurement is monitored continuously. The electric contacts and the condition of the root canal are controlled automatically. NOTES • Two beeps indicate the beginning of the measurement. The lip clip and file icons stop blinking and the movement of the file in the canal is shown; • In case of malfunction of the device no acoustic signal will be heard and the file clip and the file must be cleaned and the canal irrigated.
9
We do not recommend to continue measuring when no beeping is heard, i.e. when only the symbol is blinking!
en
5.5.3. Sound Level Selection The acoustic signals of Raypex® 5 allow to fully concentrate on the treatment instead of looking at the display. When Raypex® 5 is switched on, the previously stored sound level is activated automatically. Press the Volume button to adjust the sound volume. The selected volume is displayed by the sound level indicator.
5.5.4. Measurement Process Coronal and median region Slowly and gently insert the file into the canal. On the left side of the display the file movement is represented along the coronal and median section down to the apical region of the root canal (Fig. 7).
Fig. 8
The segments show the position of the file tip: 4 blue segments: Warning zone close to the apical region. 7 green/yellow segments: Region from the apical constriction to the apical foramen. 1 red segment: The apical foramen has been reached. Warning dot: The apical foramen has been passed (over-instrumentation!). The bottleneck at the APEX ZOOM represents the region of the apical constriction. The file movement along the apical region is accompanied by audio signals which increase in frequency the deeper the file advances. As soon as its tip reaches the apical foramen a constant beep will sound. NOTE As with all electronic length determination devices, the scale shown in the display does not represent mm or inches!
Fig. 7
Preapical and apical region On the right side of the display, the segments of the APEX ZOOM fill-up while the file advances (Fig. 8).
Endo Easy Efficient®
10
WARNING Once the file tip has passed the apical foramen the warning dot will appear and short warning beeps will sound (Fig. 9).
en
5.5.6. Interruption of measurement During the measurement cycle the file clip may be disconnected from the file and reconnected at any time without interrupting the measurement (e.g. when the file is changed to a larger size or when a second canal should be measured). The device detects automatically that a new measurement is initiated and signals it with two short beeps.
5.5.7. Automatic shutdown Shutdown is automatically activated after several minutes when Raypex® 5 was not turned off manually. To prolong the lifetime of the battery, we recommend to turn the device off after each measurement. Fig. 9
5.6. Demo mode and Virtual apex
5.5.5. Touch probe
5.6.1. Demo mode
The set of accessories includes a touch probe for convenient measuring in the molar region. It is very easy to handle as it is not necessary to fix the file clip to the measuring file. 1) Carefully insert the file into the root canal. 2) Insert the rounded end of the probe into the cable connector (instead of the file clip). 3) Simply touch the metal part of the measuring file with the fork shaped end of the probe. The electric circuit will be closed as contact between file and probe will be made. The position of the file can be read on the display and the measurement can be taken. For details on sterilization, see chapter "6. Maintenance, Cleaning and Sterilization", page 11.
The built-in Demo mode allows to acquaint yourself with the device and to demonstrate the operation to your patients. The file movement is simulated in several steps: 1) Press On-Off button (measurement cable is disconnected). 2) Press Mode button, then press Mode button again. The sequence: • The measurement cable connection icon is blinking; • This icon stops blinking. The lip clip and the file icon in the ROOT WIZARD blink (simulating the connection of the measurement cable connection); • The blinking stops and the ROOT WIZARD tracking algorithm is activated. Two beeps indicate the beginning of the measurement, and the file movement is shown on the screen;
11
• Press Mode button again to interrupt the simulation; • Press Mode button again to resume the simulation.
5.6.2. Virtual apex The additional function of the virtual apex can be activated in the demo mode. This function enables you to set an individual apical measurement point.
Setting 1) Enter Demo mode as described above, until APEX ZOOM appears. 2) Go to the segment of the required Virtual apex position (e.g. first or second greenish segment). 3) Press Mode button and hold for about 1 second until an additional beep appears. An arrow on the right side of APEX ZOOM will indicate the selected virtual apex position.(Fig. 10). 4) To continue simulation press Mode button again. When the Virtual apex is set, the audio signals will change from this point on. While the file is further advancing, the frequency increases.
Reset 1) Enter Demo mode as described above until the APEX ZOOM is displayed. 2) Proceed to the red segment or to the warning dot. 3) Press Mode button and hold for about 1 second until additional beep can be heard. The virtual apex is reset and the arrow is deleted.
6. Maintenance, Cleaning and Sterilization 6.1. General information Raypex® 5 is maintenance-free and does not have any components that need to be maintained by the user. NOTE Servicing and repair work should only be carried out by service engineers trained at the factory. The measuring cable and the surface of the equipment should be cleaned with a paper towel or soft cloth or wipe that has been wetted with aldehyde-free disinfection and cleaning solution (bactericidal and fungicidal), e.g: • DENTIRO® wipes, Oro Clean Chemie AG, Switzerland; • TopActiv wipes, ad-Arztbedarf GmbH, Germany; • SprayActiv, ad-Arztbedarf GmbH, Germany; • DY wipes, DENTSPLY, France.
Fig. 10
Endo Easy Efficient®
en
12
en
WARNINGS • To disinfect the equipment and the measuring cable, wipe the surface with a clean cloth or wipe that has been wetted only slightly with a non-aggressive disinfectant; • Do not use any liquids or sprays directly on the equipment, particularly the display; • Do not use strong alcohol to disinfect surfaces. Before preparing them for reuse, remove the lip clip, file clip or touch probe from the measuring cable. The lip clip, file clip and touch probe must always be cleaned, disinfected and sterilized before they are used. This also applies before they are used for the first time. The only way to ensure that these accessories are effectively sterilized is to thoroughly clean and disinfect them. When doing this, follow the special instructions set out in chapter "6.2. Cleaning, disinfection and sterilization (in accordance with DIN EN ISO 17664)", page 12. In addition, when you use any of the other equipment that you have in your practice, make sure you follow the directions for use for this equipment. As part of your responsibility for ensuring that the accessories are sterile, always make sure that only validated cleaning, disinfection and sterilization methods are used, that the equipment (sterilizer) is regularly maintained and inspected, and that the validated parameters are adhered to each time. In addition, ensure that you always comply with the applicable statutory rules and regulations with regard to hygiene in your practice or clinic. In particular, this applies to the guidelines regarding effective prion inactivation. For your own safety, when handling contaminated accessories, always wear gloves, protective eyewear and a surgical mask.
WARNINGS • The measuring cable cannot be autoclaved; • The use of substances and materials other than those referred to above may damage the equipment and accessories; • Do not employ sterilization methods that use heat, radiation, formaldehyde, ethylene oxide or plasma.
6.2. Cleaning, disinfection and sterilization (in accordance with DIN EN ISO 17664) The cleaning, disinfection and sterilization process applies only to the lip clip, file clip and touch probe. As long as they are treated with due care and are not damaged or contaminated, these accessories can be reused multiple times. We accept no liability in the event that these instructions are disregarded or processes that have not been validated are used to prepare the accessories for reuse. Make sure undamaged sterile packaging is used.
6.2.1. Pre-Treatment • Pulp and dentine remnants must be removed from the accessories immediately; if necessary, use a brush to carefully clean the products (no later than 2 hours after use). Do not allow remnants to dry on. After using the accessories on the patient, place them directly into a dish filled with a suitable cleaning and disinfection solution (e.g. CIDEZYME®, ENZOL® Enzymatic Detergent Solutions, Johnson & Johnson Medical, 0.8% for between 1 minute and 2 hours) for cleaning, pre-disinfection and interim storage.
13
Make sure that the products are fully immersed. Then wash the accessories under running sterile, deionized water or in a disinfection solution at least three times for one minute each time, in order to remove all visible traces of contamination and remnants. The disinfectant should be aldehyde-free (aldehyde causes blood to stain permanently), tested for efficacy (e.g. VAH/DGHM or FDA certification or CE mark), suitable for disinfecting the accessories, and compatible with the accessories (see chapter "6.2.7. Material resistance", page 15); • Only use clean, soft brushes to manually remove contamination and remnants, or a clean, soft cloth or wipe that is only used for this purpose. Do not use metal brushes or wire wool. Check that no visible contamination or remnants remain, and repeat the pre-cleaning process if necessary; • The file clip must be squeezed together and then released five times during cleaning to allow the inner parts to be cleaned more effectively. Please note that disinfectant used for pre-treatment is only for personal protection and does not obviate the need for disinfection once cleaning has been completed. Pre-treatment should never be omitted. WARNING Do not use automated processes for cleaning or disinfecting the accessories.
6.2.2. Manual cleaning and disinfection When choosing cleaning agents and disinfectants, make sure that: • They are suitable for cleaning or disinfecting instruments;
• You use a disinfectant with proven efficacy (e.g. with VAH/DGHM or FDA certification or CE mark) and that the disinfectant is compatible with the cleaning agent; • The chemicals used are compatible with the accessories (see chapter "6.2.7. Material resistance", page 15). Combined cleaning/ disinfection products should only be used if the instruments are only slightly contaminated (no visible contamination/remnants). Comply with the concentrations and contact times specified by the manufacturers of the cleaning agents and disinfectants, as well as their instructions regarding the intensity of subsequent rinsing. Use only freshly prepared solutions, water that is sterile or has a low microbe content (< 10 cfu/ml) and a low endotoxin content (< 0.25 EU/ml, e.g. purified water (PW/HPW)), and filtered, oil-free air for drying. Make sure that the accessories are not in direct contact with one another. Step-by-step procedure Cleaning 1) Place the pre-cleaned accessories into the cleaning bath for the prescribed contact time (e.g. CIDEZYME®, ENZOL® Enzymatic Detergent Solutions, Johnson & Johnson Medical, 0.8% for 1 minute); make sure that the products are fully immersed (if necessary, use a soft brush to carefully brush them down). The file clip must be squeezed together and then released five times during cleaning to allow the inner parts to be cleaned more effectively.
Endo Easy Efficient®
en
14
en
2) Then, remove the accessories from the cleaning bath and rinse them off thoroughly at least three times for one minute each time with sterile, deionized water; when you rinse it, squeeze the file clip together and then release it five times. 3) Next, place the accessories in an ultrasonic bath with a cleaning agent (e.g. CIDEZYME®, ENZOL® Enzymatic Detergent Solutions, Johnson & Johnson Medical, 0.8% for 20 minutes); make sure that the products are fully immersed (if necessary, use a soft brush to carefully brush them down). The file clip must be squeezed together and then released five times during cleaning to allow the inner parts to be cleaned more effectively. 4) Then, remove the accessories from the ultrasonic bath and rinse them off thoroughly at least three times for one minute each time with sterile, deionized water; when you rinse it, squeeze the file clip together and then release it five times. Disinfection 1) Once the accessories have been cleaned and inspected, place them into the disinfection bath for the prescribed contact time (e.g. Cidex OPA, Johnson & Johnson Medical, 100% for 20 minutes); the accessories must be sufficiently immersed in the solution. The file clip must be squeezed together and then released five times during disinfection to allow the inner parts to be disinfected more effectively. 2) Then, remove the accessories from the disinfection bath and rinse them off thoroughly at least five times for one minute each time with sterile, deionized water; when you rinse it, squeeze the file clip together and then release it five times. 3) Dry the accessories by blowing them down fully with oil-free, filtered compressed air and then leaving them to dry further in a clean place for at least 20 minutes. Once the accessories are dry, inspect and pack them as soon as possible (see the chapter entitled "6. Maintenance, Cleaning and Sterilization", page 11 and chapter "6.2.4. Packaging", page 14).
6.2.3. Inspection/Maintenance Inspect all accessories once they have been cleaned or cleaned/disinfected. Dispose of any defective accessories immediately. These defects include: • Deformation of the plastic; • Corrosion; • Discoloration of the plastic. Accessories that are still contaminated must be cleaned and disinfected again. Maintenance is not required. Do not use instrument lubricant.
6.2.4. Packaging Pack accessories into single-use sterilization packaging (single-layer packaging) that fulfils the following requirements: • Complies with DIN EN ISO/ANSI AAMI ISO 11607; • Suitable for steam sterilization (withstands temperatures of up to 142 °C (288 °F) or more, sufficient vapour permeability).
6.2.5. Sterilization Use only the sterilization methods listed below; other sterilization methods are not permitted. • Steam sterilization; • Fractionated vacuum/pre-vacuum method (at least three vacuum cycles) or gravity method with sufficient product drying (product must be sufficiently dry). The drying time that is actually required depends directly on parameters that are the sole responsibility of the user (loading configuration, how many items are loaded and how closely together they are loaded, condition of the sterilizer, etc.) and must therefore be established by the user. However, the drying time must never be less than 20 minutes;
15
• The gravity method is less effective and must only be used if it is not possible to use the fractionated vacuum method; • Steam sterilizer in accordance with DIN EN 13060 or DIN EN 285, ANSI/AAMI ST 79; • The sterilization process must be validated in accordance with DIN EN ISO 17665 (valid installation and operational qualification (IQ and OQ) and product-specific performance qualification (PQ)); • Maximum sterilization temperature 135 °C (275 °F) plus tolerance in accordance with ISO DIN EN ISO 17665; • Sterilization time (contact time at sterilization temperature) at least 3 minutes at 134 °C (273 °F). Rapid sterilization and sterilization with unpackaged accessories are not permitted. Dry heat sterilization, radiation sterilization and sterilization using formaldehyde, ethylene oxide or plasma are also not permitted. WARNINGS • Do not submerge Raypex® 5 in any liquid. • Do not switch on Raypex® 5 in the proximity of flammable products. • Regional requirements have to be followed additionally.
6.2.7. Material resistance When choosing cleaning agents and disinfectants, make sure that they do not contain any of the following substances: • Phenol; • Strong acids (pH < 6) or strong alkalis (pH > 8); • Aldehydes; • Anti-corrosive substances (especially di- or triethanolamine); • Oxidants (hydrogen peroxide, sodium hypochlorite over 5% strength); • Solvents. The material can withstand temperatures of up to 137 °C/279 °F (maximum contact temperature).
7.
Troubleshooting
If your Raypex® 5 does not seem to work properly, it does not necessarily mean that the device does not work correctly. Please first review the below checklist in order to exclude any user error or anatomic/other peculiarities before contacting your dealer. If the problem persists please contact either your local dealer or VDW GmbH Company, Germany directly.
6.2.6. Storage Once they have been sterilized, the instruments must be kept dry and free of dust in their sterilization packaging. Store Raypex® 5 in a dry place at temperatures between +10 and +40°C (50 and 104°F).
Endo Easy Efficient®
en
16
Problem en
Possible Cause
Solution
THE DEVICE CANNOT Is the battery empty? BE SWITCHED ON WITH THE ON/OFF BUTTON
Check the battery-low indicator! If necessary charge the battery with the charger.
Is the battery placed correctly?
Does the correctly?
Open the battery compartment, and by disconnecting and reconnecting check the battery.
button
function Check the button by pressing it several times.
THE DEVICE SHUTS OFF ABRUPTLY WHILE MEASURING
Is the battery empty?
Check the battery-low indicator! If necessary charge or change the battery.
NO ACOUSTIC SIGNAL WHILE MEASURING
Is the volume set at “mute”?
Adjust the sound level.
DISPLAY NOT STEADY WHILE MEASURING
Is there contact between the lip Ensure good contact between the clip and the oral mucosa? mucosa and lip clip. (Place lip clip in the labial angle opposite to the tooth to be treated!). Is the file clip soiled?
Clean the file clip (with Ethanol).
Is the file clip connected properly Place the file clip on the metal part of to the measuring file? the file below the plastic handle. THE ELECTRIC CIRCUIT IS NOT COMPLETE, I.E. DISPLAY DOES NOT ACCURATELY REPRESENT THE FILE MOVEMENT IN THE ROOT CANAL: APEX ZOOM IS NOT DISPLAYED
Is the lip clip connected? Are the cable and connected correctly? Is the measurement damaged, e.g. torn?
Check the cable and plug connections: plugs -- Are they plugged-in correctly? -- Is any damage to cable or plug cable visible? -- Check cable and device with the tester plug according to instructions (details in following chapter "7.3. Checking the device", page 18).
Is the measuring file correctly Check if the file clip is clamped onto the attached to the file clip, i.e. metal part of the file below the plastic clamped onto the plastic handle? handle. Test to control the function: -- Moisten the palm of your hand and bring the file and the lip clip together on it to test the conductivity (the display will react by showing the apex).
17
Problem
Possible Cause
Solution
THE ELECTRIC CIRCUIT IS NOT COMPLETE
Is the root canal obliterated?
Check the comparative xray image for hints. Catheterisation with ISO 06/ 08 file until working length.
In the case of re-treatment: Take a check x-ray image and try are old filling material residues to remove old root filling material blocking the root canal? remnants prior to measuring. Is the root canal blocked by Completely remove remnants prior to remnants of a medicated measuring. substance (e.g. calcium hydroxide)? Is the root canal extremely dry?
Rinse root canal with NaCl. Dry the access cavity with a cotton pellet/ airblower.
Is ISO size of the measuring file If there is no parietal contact use larger too small for a large root canal? ISO size for file. WARNING Exactly fitting file leads to precise results. DISPLAY REACTION IS OVER-SENSITIVE: APEX ZOOM IS ACTIVATED BEFORE THE APEX IS REACHED.
Short circuit due to excess liquid Dry the access cavity with a cotton (irrigation solution, saliva, blood) pellet/air-blower. in the pulp chamber? In case of excess blooding wait until it can be stopped. Is there a direct contact of the For isolation: measuring file with the gingiva - Adequate preparation filling; or gingival proliferations, e.g. a - Use a rubber dam; fractured metal crown? - Electro-cauterise. Is there a direct contact of Carefully enlarge access cavity and the measuring file with metal isolate with flow composite. restorations (crown, parapulpal post, amalgam filling)? (Direct electric current from metal to gingiva or to the parodontium creates a leakage current causing premature display of the foramen apicale).
Endo Easy Efficient®
Isolate the measuring file by placing 2-3 silicone stoppers on it or insert measuring file in a small polyvinyl tube before use.
en
18
In case of root fracture or perforation it is impossible to take a precise length determination. en
The electric current is leaking along the fracture gap or the perforation.
7.2. Tester for operation check-up The tester plug is used to check the operation of the apex locator Raypex® 5 and the cables, and to ensure proper function.
7.3. Checking the device 1) Remove measuring cable/charger (if plugged in) from the device and turn the device OFF. 2) Insert the tester plug into cable jack as shown on Fig. 13.
Fig. 11
7.1. Electric Length Determination and X-Ray Technique As radiographs only reproduce in a two‑dimensional way a three-dimensional root canal system, there are a few cases in which the x‑ray image and the result obtained with electric length determination do not match. This does not mean that your Raypex® 5 is not working properly or that the x‑ray image is inaccurate. These discrepancies in measurement occur due to anatomical variation. The actual apical foramen may not be located at the radiographic apex of the root. In these cases, it is important to use the Raypex® 5 recording as the more accurate measurement.
Fig. 13
3) Turn the device ON. 4) The reading in the Apex Zoom must be located within the greenish section, between 5th and 7th bar, (see red marking on Fig. 14).
Fig. 14
In the case of a lateral canal curvature the x-ray image may show a shorter working length than with Raypex® 5. Fig. 12
19
5) Take the tester plug out of the cable jack when check-up is completed. WARNING Readings outside of the greenish section indicate that the device is not functioning properly. In this case contact either your local distributor for assistance or directly VDW GmbH, Munich.
7.4. Checking the measuring cable (ONLY AFTER checking the device) 1) Turn the device OFF. 2) Remove the tester plug from cable jack and connect the measuring cable to the device. 3) Connect file clip and lip clip with the measuring cable (or use instead of the lip clip a second file clip). 4) Connect file clip and lip clip (or a second file clip) with contact strips on the tester plug as shown below on Fig. 15.
WARNING Readings outside of the greenish section indicate that the device is not functioning properly. In this case contact either your local distributor for assistance or directly VDW GmbH, Munich.
8.
Conformity
The device is CE-marked according to MDD 93/42/EEC, revised by the Directive 2007/47/EC.
0123 Notified Body TÜV Produkt Service GmbH Ridlerstrasse 65 80339 Munich, Germany
9.
Manufacturer
VDW GmbH Bayerwaldstr. 15 81737 Munich Germany Fig. 15
5) Turn the device ON. 6) The reading in the Apex Zoom must be located within the greenish section, between 5th and 7th bar, (see red marking on Fig. 14). 7) When check-up is completed disconnect file clip(s) and lip clip from contact strips on tester plug.
Phone: Fax:
+49 (0) 89 627 34 - 0 +49 (0) 89 627 34 - 304
Website: www.vdw-dental.com Email: info@vdw-dental.com
Endo Easy Efficient®
en
20
en
10. Warranty
12. Technical Specifications
VDW GmbH warrants this product against defects in material or workmanship for a period of 12 months from date of purchase. Cables and battery are covered by a warranty period of 6 months. During the warranty period a product determined by VDW to be defective will be repaired or, at the option of the manufacturer, will be replaced at no charge. The warranty does not apply if the product has been damaged by accident, abuse, misuse, or as a result of service or modification other than by person authorized by VDW. The warranty is in lieu of any other warranty expressed or implied. The return and the costs of the product are at the customer’s charge.
Raypex® 5 belongs to the following category of medical devices: • Internal battery power (3.6V NiMH rechargeable battery); • Protection against electric shock: Type BF; • Do not use in proximity of flammable anesthetic mixtures containing air, oxygen or nitrogen oxide; • Continuous operation; • No protection against ingress of liquids; • Environmental conditions during transportation: -- Temperatures: between –20ºC and +60ºC (4 to 140ºF); -- Relative humidity: 10% to 90%, non-condensing.
11. Disclaimer
12.1. Specifications
VDW, its representatives and dealers shall have no liability or responsibility for damages caused by the clinical use of their products, whether the use is accidentally associated with other electromedical devices (e.g. pace-makers) or not. VDW reserves the right to implement changes and modifications of the product at any time, to revise this user manual and to make changes in the contents hereof without notice. VDW, its representatives and dealers shall have no liability or responsibility for damages caused by improper use of the device, not according to the Directions For Use.
DIMENSIONS
130 x 105 x 40mm (6 ¼ x 3 ¼ x 1 3/8“)
WEIGHT
480gr. (1.0lb)
DISPLAY
Graphic color Liquid Crystal Display
DISPLAY DIMENSIONS
106 x 60mm (3 ¼ x 2“)
POWER SOURCE
Rechargeable battery 3.6V (NiMH)
EXTERNAL CHARGER
AC input 230V, 50Hz / 115V, 60Hz, DC output: 7.5V
WARNING Only use the original charger !