VERATHON Inc
GlideScope TITANIUM SYSTEM Quick Start
Quick Start
2 Pages

Preview
Page 1
QUICK START
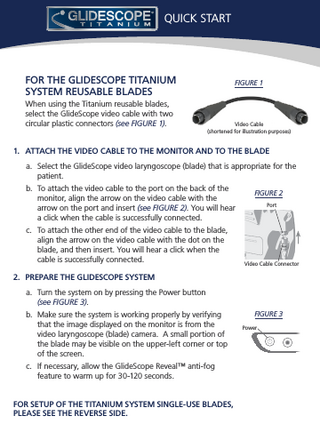
FOR THE GLIDESCOPE TITANIUM SYSTEM REUSABLE BLADES When using the Titanium reusable blades, select the GlideScope video cable with two circular plastic connectors (see FIGURE 1).
FIGURE 1
Video Cable (shortened for illustration purposes)
1. ATTACH THE VIDEO CABLE TO THE MONITOR AND TO THE BLADE a. Select the GlideScope video laryngoscope (blade) that is appropriate for the patient. b. To attach the video cable to the port on the back of the monitor, align the arrow on the video cable with the arrow on the port and insert (see FIGURE 2). You will hear a click when the cable is successfully connected. c. To attach the other end of the video cable to the blade, align the arrow on the video cable with the dot on the blade, and then insert. You will hear a click when the cable is successfully connected.
FIGURE 2 Port
Video Cable Connector
2. PREPARE THE GLIDESCOPE SYSTEM a. Turn the system on by pressing the Power button (see FIGURE 3). b. Make sure the system is working properly by verifying that the image displayed on the monitor is from the video laryngoscope (blade) camera. A small portion of the blade may be visible on the upper-left corner or top of the screen. c. If necessary, allow the GlideScope Reveal™ anti-fog feature to warm up for 30-120 seconds. FOR SETUP OF THE TITANIUM SYSTEM SINGLE-USE BLADES, PLEASE SEE THE REVERSE SIDE.
FIGURE 3 Power
QUICK START
FOR THE GLIDESCOPE TITANIUM SYSTEM SINGLE-USE BLADES When using the Titanium single-use blades, select the GlideScope Smart Cable with one circular plastic connector and one titanium connector (see FIGURE 1).
FIGURE 1 GlideScope Smart Cable (shortened for illustration purposes)
Titanium Connector
1. ATTACH THE SMART CABLE TO THE MONITOR AND TO THE BLADE a. Select the GlideScope video laryngoscope (blade) that is appropriate for the patient. b. To attach the Smart Cable to the port on the back of the monitor, align the arrow on the Smart Cable plastic connector with the arrow on the port, and then insert (see FIGURE 2). You will hear a click when the cable is successfully connected. c. To attach the other end of the Smart Cable to the blade, align the arrow on the Smart Cable titanium connector with the arrow on the blade and insert.
FIGURE 2 Port
Smart Cable Plastic Connector
2. PREPARE THE GLIDESCOPE SYSTEM a. Turn the system on by pressing the Power button (see FIGURE 3). b. Make sure the system is working properly by verifying that the image displayed on the monitor is from the video laryngoscope (blade) camera. A small portion of the blade may be visible on the upper-left corner or top of the screen.
FIGURE 3 Power
c. If necessary to prevent fogging, allow 30–120 seconds for the LED to warm up. M
verathon.com glidescope.com
Corporate Headquarters: Verathon Inc. 20001 North Creek Parkway Bothell, WA 98011, USA Tel: 800.331.2313 (US and Canada only) Tel: 425.867.1348 Fax: 425.883.2896
Manufacturer: Verathon Medical (Canada) ULC 2227 Douglas Road Burnaby, British Columbia Canada, V5C 5A9
P EC Representative: Verathon Medical (Europe) B.V. Linnaeusweg 11 3401 MS IJsselstein, The Netherlands Tel: +31.30.68.70.570 Fax: +31.30.68.70.512
GlideScope, the GlideScope symbol, Reveal, Verathon, and the Verathon Torch symbol are trademarks of Verathon Inc. ©2014 Verathon Inc. GlideScope video laryngoscope systems are CE marked in accordance with the Medical Device Directive, and the Verathon Inc. quality system is Quality System Certified to ISO 13485:2012 standards. 0900-4415-01-60