VISION SCIENCES
Endoscope with EndoSheath Reprocessing Chart Rev B March 2010
Chart
1 Page
Preview
Page 1
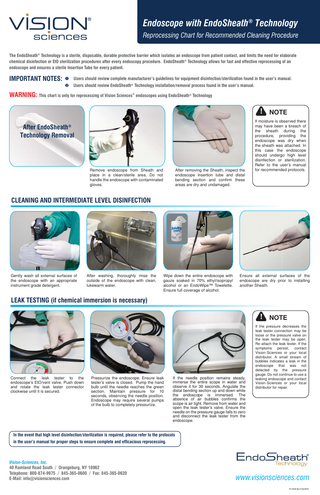
Endoscope with EndoSheath® Technology Reprocessing Chart for Recommended Cleaning Procedure The EndoSheath® Technology is a sterile, disposable, durable protective barrier which isolates an endoscope from patient contact, and limits the need for elaborate chemical disinfection or EtO sterilization procedures after every endoscopy procedure. EndoSheath® Technology allows for fast and effective reprocessing of an endoscope and ensures a sterile Insertion Tube for every patient.
IMPORTANT NOTES: Users should review complete manufacturer’s guidelines for equipment disinfection/sterilization found in the user’s manual. Users should review EndoSheath® Technology installation/removal process found in the user’s manual.
WARNING: This chart is only for reprocessing of Vision Sciences endoscopes using EndoSheath Technology ®
®
NOTE
After EndoSheath Technology Removal ®
Remove endoscope from Sheath and place in a clean/sterile area. Do not handle the endoscope with contaminated gloves.
After removing the Sheath, inspect the endoscope insertion tube and distal bending section and confirm these areas are dry and undamaged.
If moisture is observed there may have been a breach of the sheath during the procedure, providing the endoscope was dry when the sheath was attached. In this case the endoscope should undergo high level disinfection or sterilization. Refer to the user’s manual for recommended protocols.
CLEANING AND INTERMEDIATE LEVEL DISINFECTION
Gently wash all external surfaces of the endoscope with an appropriate instrument grade detergent.
After washing, thoroughly rinse the outside of the endoscope with clean, lukewarm water.
Wipe down the entire endoscope with gauze soaked in 70% ethyl/isopropyl alcohol or an EndoWipe™ Towelette. Ensure full coverage of alcohol.
Ensure all external surfaces of the endoscope are dry prior to installing another Sheath.
LEAK TESTING (if chemical immersion is necessary) NOTE
Connect the leak tester to the endoscope’s EtO/vent valve. Push down and rotate the leak tester connector clockwise until it is secured.
Pressurize the endoscope. Ensure leak tester’s valve is closed. Pump the hand bulb until the needle reaches the green section. Maintain pressure for 10 seconds, observing the needle position. Endoscope may require several pumps of the bulb to completely pressurize.
If the needle position remains steady, immerse the entire scope in water and observe it for 30 seconds. Angulate the distal bending section up and down while the endoscope is immersed. The absence of air bubbles confirms the scope is air tight. Remove from water and open the leak tester’s valve. Ensure the needle on the pressure gauge falls to zero and disconnect the leak tester from the endoscope.
If the pressure decreases the leak tester connection may be loose or the pressure valve on the leak tester may be open. Re-attach the leak tester. If the symptoms persist, contact Vision-Sciences or your local distributor. A small stream of bubbles indicates a leak in the endoscope that was not detected by the pressure gauge. Do not continue to use a leaking endoscope and contact Vision-Sciences or your local distributor for repair.
In the event that high level disinfection/sterilization is required, please refer to the protocols in the user’s manual for proper steps to ensure complete and efficacious reprocessing. ®
Vision-Sciences, Inc. 40 Ramland Road South / Orangeburg, NY 10962 Telephone: 800-874-9975 / 845-365-0600 / Fax: 845-365-0620 E-Mail: info@visionsciences.com
www.visionsciences.com PL12345 Rev B 03/2010