Vitalograph
micro Quick Start Guide
Quick Start Guide
4 Pages
Preview
Page 1
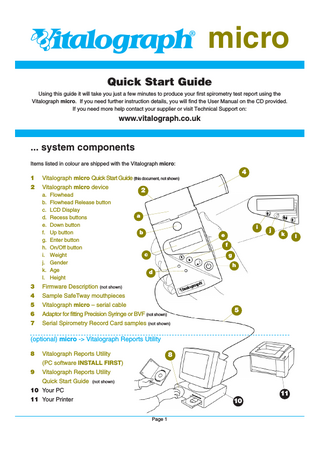
Vitalograph® micro Quick Start Guide Using this guide it will take you just a few minutes to produce your first spirometry test report using the Vitalograph micro. If you need further instruction details, you will find the User Manual on the CD provided. If you need more help contact your supplier or visit Technical Support on:
www.vitalograph.co.uk
... system components Items listed in colour are shipped with the Vitalograph micro:
4 1 2
Vitalograph micro Quick Start Guide (this document, not shown) Vitalograph micro device a. Flowhead b. Flowhead Release button c. LCD Display d. Recess buttons e. Down button f. Up button g. Enter button h. On/Off button i. Weight j. Gender k. Age l. Height
2
a i b
e
j
k
f c
g h d
3
Firmware Description (not shown)
4
Sample SafeTway mouthpieces
5
Vitalograph micro – serial cable
6
Adaptor for fitting Precision Syringe or BVF (not shown)
7
Serial Spirometry Record Card samples (not shown)
5
(optional) micro -> Vitalograph Reports Utility 8
Vitalograph Reports Utility
8
(PC software INSTALL FIRST) 9
Vitalograph Reports Utility Quick Start Guide (not shown)
10 Your PC
11
11 Your Printer
10 Page 1
l
... installing the battery in the micro A 9-V (e.g. PP3) disposable battery (not provided) must be installed before the Vitalograph micro can be used. Note that it is recommended to remove the battery if the Vitalograph micro is not used for several months
1
Open the battery compartment door at the back of the unit.
2
Push the battery connector onto the battery terminals.
3
Fit the battery into the battery compartment making sure the leads are pushed into the entry cavity.
4
Close the battery compartment door.
... setting the Units, Time and Date on the micro Follow these instructions in sequence to set the units, time and date, or skip this section to change settings later.
1
1
To enter configuration mode, press the On/Off button to turn on the device, press the Enter button repeatedly until the time is displayed. press the top Recess button and the Down button at the same time to enter configuration mode. Note that the Vitalograph micro turns itself off if not used within two minutes.
2
To set the Units press the Down button to change the Thumbs Up/Down symbol to: Thumb Up for US date format, or, Thumb Down for European data format, press the Enter button to continue.
3
To set the Time, press the Up or Down buttons to select the correct Hour,
3
Note that pressing continuously on a button changes the number quickly.
press the Enter button, press the Up or Down buttons to select the correct Minute press the Enter button to continue
4 4
To set the Date, press the Up or Down buttons to select the correct Year press the Enter button, press the Up or Down buttons to select the correct Month press the Enter button, press the Up or Down buttons to select the correct Day press the Enter button and when ACC and the Thumb Down symbol is displayed press the Enter button again to finish.
Page 2
2
... performing the FVC test 1
If the device has powered down, press the On/Off button, and after several seconds the display will look something like… You now need to enter the subject’s: height, age, gender, and weight, in that order.
2
To enter height, press the Up or Down buttons to set the height to between 0 and 250cm (or between 0 and 99 inches if in USA mode), press the Enter button to continue
3
To enter age, press the Up or Down buttons to set the age to between 0 and 99, press the Enter button to continue
1
2
3
Note that if a value of 0 is entered for either height or age the rest of the demographic entry will be skipped and the device goes straight to test mode. If this occurs no predicted parameters will appear on the printouts. Note that to return to the previous screen, press the Up and Down buttons together.
4
To enter gender, press the Up or Down buttons to set the gender to 0 for male, or 1 for female, press the Enter button to continue.
5
To enter weight, press the Up or Down buttons to set the weight to between 0 kg and 250 kg (or between 0 and 550 lbs if in USA mode), press the Enter button to continue, and after several seconds the display will look like ... You are now ready to perform the test.
4
5
Note that it is only possible to perform a test when the Blow icon is displayed so always watch for it, it will be accompanied by two beeps.
6
To perform test, fit a disposable SafeTway mouthpiece (single use only) onto the micro, and give the following instructions to the subject so that testing is performed properly: Note that it is advisable to also perform an animated demonstration of the test technique, using a mouthpiece, prior to the subject performing the test. a) Sit upright, fit the noseclip and relax (the use of a nose-clip is recommended), b) Hold the unit, keeping it away from your mouth. Do not jerk the unit (this can de-stabilize the unit). c)
Inhale as deeply as possible, then insert the mouthpiece carefully into your mouth, not like a trumpet, but clamping it gently between your teeth.
d) Seal your lips round the mouthpiece and keep your tongue down. e) Blow out as fast and as long as possible. Keep blowing for at least 6 seconds. (From the very beginning of the blow the operator should encourage the subject to keep going in a lively fashion. Keep eye contact with the subject). f)
After 6-s instruct the subject to rest – say ‘Well done!’ cont ...
Page 3
Listen for two beeps. This indicates that the Vitalograph micro is ready for the next blow. Repeat the blow three times or more to obtain good test quality. To view parameters after each blow, press the Up and Down buttons to scroll through the spirometric parameters, FVC, FEV1, FEV1%, PEF, and if desired make a provisional note of the result.
6
Note that the last test is always displayed, not the best test. The ‘best test’ is stored and may be transmitted.
After the testing series is completed, take the device and thank the subject for their co-operation. CONGRATULATIONS! YOU HAVE SUCCESSFULLY COMPLETED YOUR FIRST SPIROMETRY TEST ON YOUR VITALOGRAPH MICRO
... transmitting to the Vitalograph Reports Utility The ‘best test’ in the series is stored and may be transmitted to the Vitalograph Reports Utility on your PC where it can be stored as a PDF file and viewed or printed. BEFORE YOU CAN TRANSMIT YOU MUST HAVE THE ‘VITALOGRAPH REPORTS UTILITY’ INSTALLED AND RUNNING ON YOUR PC. If the ‘Snake V’ icon is showing in your PC System Tray then the utility is running, if not refer to Vitalograph Reports Utility instructions.
1
To transmit the ‘best test’ data, first wait until the Blow icon reappears on the micro display, then plug in the PC serial cable jack plug into the side of the Vitalograph micro, press the Up and Down buttons to scroll to PRN on the Vitalograph micro , press the Enter button to start the transmission,
1
The Vitalograph micro’s display goes blank while transmitting. Put down the device and wait for transmission to finish because this process takes about 2 minutes. When it has finished the Vitalograph micro briefly goes back to ‘PRN’, then it will ‘beep’ and switch itself off. The PDF spirometry report will soon appear in the ‘Vitalograph Reports’ folder shortcut on your desktop.
... updating Serial Spirometry Record sheets The subject’s highest FEV1 should be recorded on a Serial Spirometry Record sheet on every visit. After only the second spirometer test session it becomes apparent whether change in lung function is normal. Serial Spirometry Record Sheets can be ordered from your Vitalograph distributor, Cat.No.63054 ‘Serial Spirometry Records’.
... consumables and accessories 20242 . . SafeTway mouthpieces (200) 63054 . . Serial Spirometry Records (6 x 50)
from Vitalograph®
20303 . . Nose Clips (10)
... the spirometry people
l
Vitalograph Ltd. • Maids Moreton • Buckingham • MK18 1SW • England • Tel: +44 (0) 1280 827110 • Fax: +44 (0) 1280 823302 • E-mail: [email protected] Vitalograph GmbH. • Jacobsenweg 12 • 22525 Hamburg • Germany • Tel: (040) 547391-0 • Fax: (040) 547391-40 • E-mail: [email protected] Vitalograph Inc. • 13310 West 99th Street • Lenexa • Kansas 66215 • USA • Tel.: (913) 888 4221 • Fax: (913) 888 4259 • E-mail: [email protected] Vitalograph (Ireland) Ltd. • Gort Road Business Park • Ennis • Co. Clare • Ireland • Tel.: (065) 6864100 • Fax: (065) 6829289 • E-mail: [email protected] Internet: www.vitalograph.co.uk • www.vitalograph.com • www.vitalograph.de • www.vitalograph.ie Vitalograph® and Safetway® are registered trademarks of Vitalograph Ltd.
05291/1