Quick Reference Guide
2 Pages

Preview
Page 1
ThermoScan® PRO 6000
®
Quick Reference Guide
Welch Allyn Technical Support (www.welchallyn.com/support)
901054
visit locations (www.welchallyn.com/about/company/locations.htm)
Operation and technique
1
1a
1b
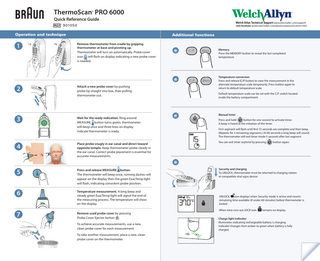
Additional functions Remove thermometer from cradle by gripping thermometer at base and pivoting up. Thermometer will turn on automatically. Probe cover icon will flash on display indicating a new probe cover is needed.
2
Attach a new probe cover by pushing probe tip straight into box, then pulling thermometer out.
3
Wait for the ready indication. Ring around MEASURE button turns green, thermometer will beep once and three lines on display indicate thermometer is ready.
4
Place probe snugly in ear canal and direct toward opposite temple. Keep thermometer probe steady in the ear canal. Correct probe placement is essential for accurate measurements.
5
Press and release MEASURE button. The thermometer will beep once, running dashes will appear on the display then the green ExacTemp light will flash, indicating consistent probe position.
6
Temperature measurement. A long beep and steady green ExacTemp light will signal the end of the measuring process. The temperature will show on the display.
7
Remove used probe cover by pressing Probe Cover Ejector button . To achieve accurate measurements, use a new, clean probe cover for each measurement. To take another measurement, place a new, clean probe cover on the thermometer.
*
C/F
Mem
*
C/F
Mem
Memory Press the MEMORY button to reveal the last completed temperature.
Temperature conversion Press and release C/ F button to view the measurement in the alternate temperature scale temporarily. Press button again to return to default temperature scale. Default temperature scale can be set with the C/F switch located inside the battery compartment.
*
Manual timer Press and hold button for one second to activate timer. A beep is heard at the initiation of the timer. First segment will flash until first 15 seconds are complete and then beep. (Repeats for 3 remaining segments.) At 60 seconds a long beep will sound. The thermometer will exit timer mode 5 seconds after last segment. You can exit timer anytime by pressing
*
button again.
Security and charging To UNLOCK, thermometer must be returned to charging station or compatible vital signs device.
UNLOCK icon displays when Security mode is active and counts remaining time available (if under 60 minutes) before thermometer is locked. When time runs out LOCK icon
remains on display.
Charge light indicator Illuminates indicating rechargeable battery is charging. Indicator changes from amber to green when battery is fully charged.
Errors and notifications Error Message
What affects accuracy
Situation
Solution
No probe cover is attached (animates ON).
Attach new, clean probe cover.
External factors may influence ear temperatures, including: Factor
Affected
Not affected
Used probe cover Ambient temperature Wet / dirty / damaged lens
Used probe cover is attached (animates OFF).
Discard probe cover that is on and attach new, clean probe cover if taking another temperature measurement.
Hearing aid Lying on pillow Moderate cerumen (ear wax) Otitis media (ear infections)
(POS = position error) The infrared monitor cannot find a temperature equilibrium and allows no measurement.
Change the probe cover to reset. Restrict patient movement and ensure that the positioning of the probe is correct and remains stable while taking new temperature.
Ambient temperature is not within the allowed operating range (50 – 104 °F or 10 – 40 °C) or changing too rapidly.
Temperature taken is not within typical human temperature range. HI will be displayed when temperature is higher than 108 °F (42.2 °C).
Tympanostomy tubes Note: If lens is dirty or inserted into ear canal without probe cover refer to maintenance and service section in directions for use. Only clean as specified by manufacturer.
Replacing the batteries
Wait 20 sec. until thermometer turns off automatically, then turn on again. Ensure thermometer and patient are in an environment for 30 minutes where the temperature is between 50 ºF and 104 ºF or 10 ºC and 40 ºC.
Change 2 AA alkaline batteries when flash on the display.
Open battery door Open battery door by sliding spring latch to the right using your finger or a pointed object such as a pen. While holding the latch in the open postion, grasp the battery door and remove it.
Change probe cover to reset. Then, make sure thermometer is properly inserted and take a new temperature.
LO will be displayed when temperature is lower than 68 °F (20 °C).
Remove the 2 AA alkaline batteries and replace with 2 new AA alkaline batteries, making sure the poles are in the right direction.
System error (All icons display or display is blank)
Wait 20 seconds until the thermometer turns off automatically, then turn on again.
If error persists,
… reset the thermometer by removing the batteries and putting them back in.
or
begins to
If error still persists,
… batteries are dead. Insert new batteries.
If error still persists,
… contact local Welch Allyn Service Center or representative.
Battery is low, but thermometer will still operate correctly.
Insert new batteries.
Battery is too low to allow temperature measurement.
Insert new batteries.
Snap battery door back into place and ensure the latch returns to original latch position.
an
®
rmoSc
The
Rechargeable battery pack Insert rechargeable battery pack into battery compartment with battery label facing outward.
© 2019 All rights reserved. This product is manufactured under license to the ‘Braun' trademark. 'Braun' is a registered trademark of Braun GmbH, Kronberg, Germany. ThermoScan is a registered trademark owned by Helen of Troy Limited.
®
Manufactured by: Welch Allyn, Inc. 4341 State Street Road Skaneateles Falls, NY 13153 USA
Welch Allyn Limited Navan business Park Dublin road, Navan, County Meath Republic of Ireland C15 AW22
Made in Mexico
DIR 80025048 Rev C Revision date: 2019-10