2 Pages

Preview
Page 1
E-Type Contra Angle Sheath
EC/ER4/ER10/ER16/ER64/ER128 ECM/ER4M/ER10M/ER16M/ER64M/ER128M
OM-C0341E 002
CAUTION · When operating the Product always consider the safety of the patient. · Place the most priority for the safety of all patients. · When it is found abnormal during use, stop immediately. Do not use, and report to the dealer that was purchased from. · Do not disassemble the sheath except for the referred to herein, nor alter. · Do not impact on the sheath, nor drop onto hard surface. · Always watch for vibration, sound, temperature rise, bur wobble, and other abnormalities. · Disconnect the sheath after the driver unit is in complete stop. · The device accepts NSK Y-type heads. · When the sheath might be subjected to a high torque, such as in implant application, use the I-type sheath (ER16i, ER20i, ER32i, ER64i, ER256i) with I-type head. · In case blood or contaminants entered the head, immediatery remove the head cartridge and the transmission gear. Clean and lubricate them. Assemble carefully. · Do not wipe with, or clean or immerse in, high acid water or sterilizing solutions.
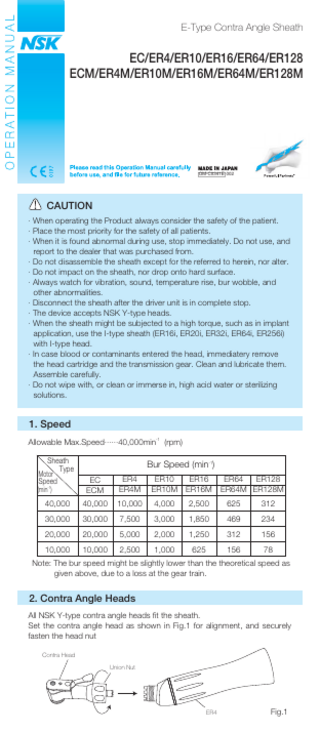
1. Speed Allowable Max.Speed······40,000min-1 (rpm) Sheath Type
Motor Speed
Bur Speed (min-1) EC ECM
ER4 ER4M
ER10 ER16 ER10M ER16M
40,000
40,000
10,000
4,000
2,500
625
312
30,000
30,000
7,500
3,000
1,850
469
234
20,000
20,000
5,000
2,000
1,250
312
156
10,000
10,000
2,500
1,000
625
156
78
(min-1)
ER64 ER128 ER64M ER128M
Note: The bur speed might be slightly lower than the theoretical speed as given above, due to a loss at the gear train.
2. Contra Angle Heads All NSK Y-type contra angle heads fit the sheath. Set the contra angle head as shown in Fig.1 for alignment, and securely fasten the head nut Contra Head Union Nut
ER4
Fig.1
3.Lubrication Supply PANA-SPRAY Plus / PANA-SPRAY after each use and/or before autoclaving. 1 Push E-type spray nozzle attachment over the PANA-SPRAY Plus
nozzle until it firmly seats. 2 Shake the can 3-4 times to well mix lubricant and propellant. 3 Insert the E-type spray nozzle in the rear of the handpiece and
spray for approximately 2-3 seconds until the oil comes out of the handpiece head or nose. E-type Spray Nozzle
Handpiece
PANA-SPRAY Plus / PANA-SPRAY
Fig.2
PANA-SPRAY Plus / PANA-SPRAY
CAUTION · Be sure to hold the handpiece firmly to prevent the handpiece from slipping out by the spray pressure when lubricating. · Keep the spray can upright.
4.Cleaning and Sterilization The products listed below are washable with Thermo Disinfector. ECM, ER4M,ER10M, ER16M, ER64M, ER128M Sterilization by autoclaving is recommended. Sterilization is required first time you use and after each patient as noted below. Autoclaving procedure 1 Brush off dirt and wipe clean with alcohol-soaked cloth or paper towel. 2 Remove reduction sheath from the motor and lubricate. Ref.3 Lubrication. 3 Insert into a sterilization bag and seal it. 4 Autoclavable up to a max. 135°C.
ex.) Autoclave for 20 min. at 121°C, or 15 min. at 132°C. 5 Keep the handpiece in the sterilization bag to keep it clean until you use it.
* Sterilization at 121°C for more than 15 minutes is recommended by EN13060 or EN ISO17665-1.
CAUTION on Sterilization · Heating element may be located at the bottom of the chamber, and the temperature there locally may exceed the set value. Place the handpiece on the central or upper tray. · Do not autoclave the handpiece, even when it is bagged, together with other instruments, from which chemicals are not sufficiently cleaned. This is to avoid discoloration and/or damage the plating of the handpiece. The EU directive 93/42/EEC was applied in the design and production of this medical device.
’10.02.05 S